Signed-In Google Google Meet Bots
Sign in your Google Meet bots to a Google Account
By default the Google Meet bot will join meeting as guest participant.
This can lead to limitations like:
- Showing a warning message that the bot may not be who they claim to be
- Not able to change avatar image
- Not able to join meetings which only allow signed in users.
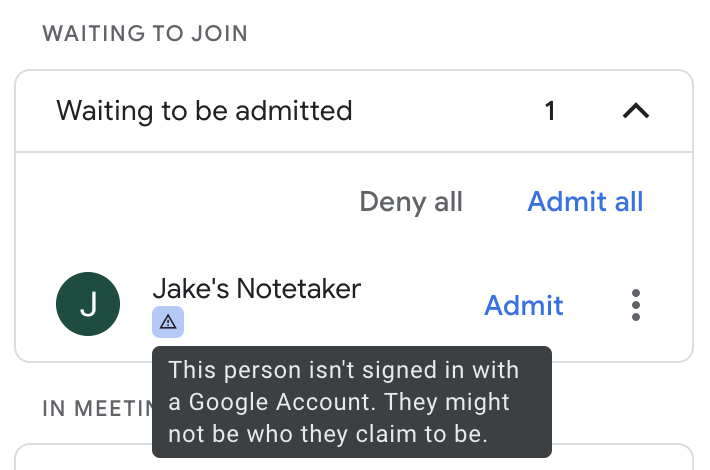
(1) Unauthenticated Teams bot warning message.
This warning can be uncomfortable for end users, especially if they don't understand it.
You can avoid this using Signed-in Google Meet bots.
In order to avoid these, Recall supports authenticating your Google Meet bots by providing them a set of configurable credentials before joining a meeting.
Bot name not configurable
Since authenticated Google meet bots get their name from the Google account used to authenticate the bot, this overrides the
bot_nameparameter in Create Bot endpoint.
Setup
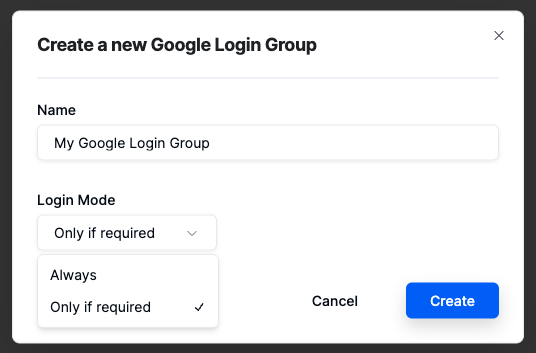
1. Create a Google Login Group
A login group stores references to multiple logins(Google accounts). This allows Recall to perform a round robin allocation and avoid hitting concurrency limitations for authenticated accounts.
(Recommended): Create the Login in the dashboard
To create a Google Login Group, click the "Create Group" button on the Google Logins page in the explorer:
To control whether or not Meet bots should always sign in (vs. only when the meeting requires it), you can configure the login_mode:
Alternative: Create the Login Group through the API:
You can also use the Create Login Group endpoint to add a login group.
name- Allows you to set a name to the login group (for e.gProduction Primary)login_mode- Set whether bots using this login group should always login or only if required.
Example curl request:
curl --request POST \
     --url https://us-east-1.recall.ai/api/v2/google-login-groups/ \
     --header 'Authorization: ${RECALL_API_KEY}' \
     --header 'accept: application/json' \
     --header 'content-type: application/json' \
     --data '
{
  "login_mode": "always",
  "name": "Bot Group 1"
}
'
When the bot joins the call, it will use a login(Google account) (will be setup in Step 3) from the login group to authenticate itself.
2. Create a new Google Workspace
The bot uses SSO based authentication and in order to proceed you need to create a new dedicated Google Workspace.
- You can use any domain, either a new domain that you register for this purpose, or a subdomain of your primary domain. For instance
sso.yourcompany.com. You cannot reuse your existing Google Workspace if you already have one. The reason is because this method relies on the organization-wide SSO policy which will break login for all accounts on your existing Google Workspace. - You can use email like
bot@sso.yourcompany.comto sign up for the dedicated Google workspace. - You must have a paid workspace, it can be on the cheapest (starter) tier. You can start with single user but may need to add more users depending on your concurrent bot usage.
Setup SSO Profile
- Create an RSA private key and self-signed certificate. Store these files somewhere safe! They will be needed in later steps
openssl req -x509 -newkey rsa:2048 -keyout key.pem -out cert.pem -sha256 -days 3650 -nodes
-
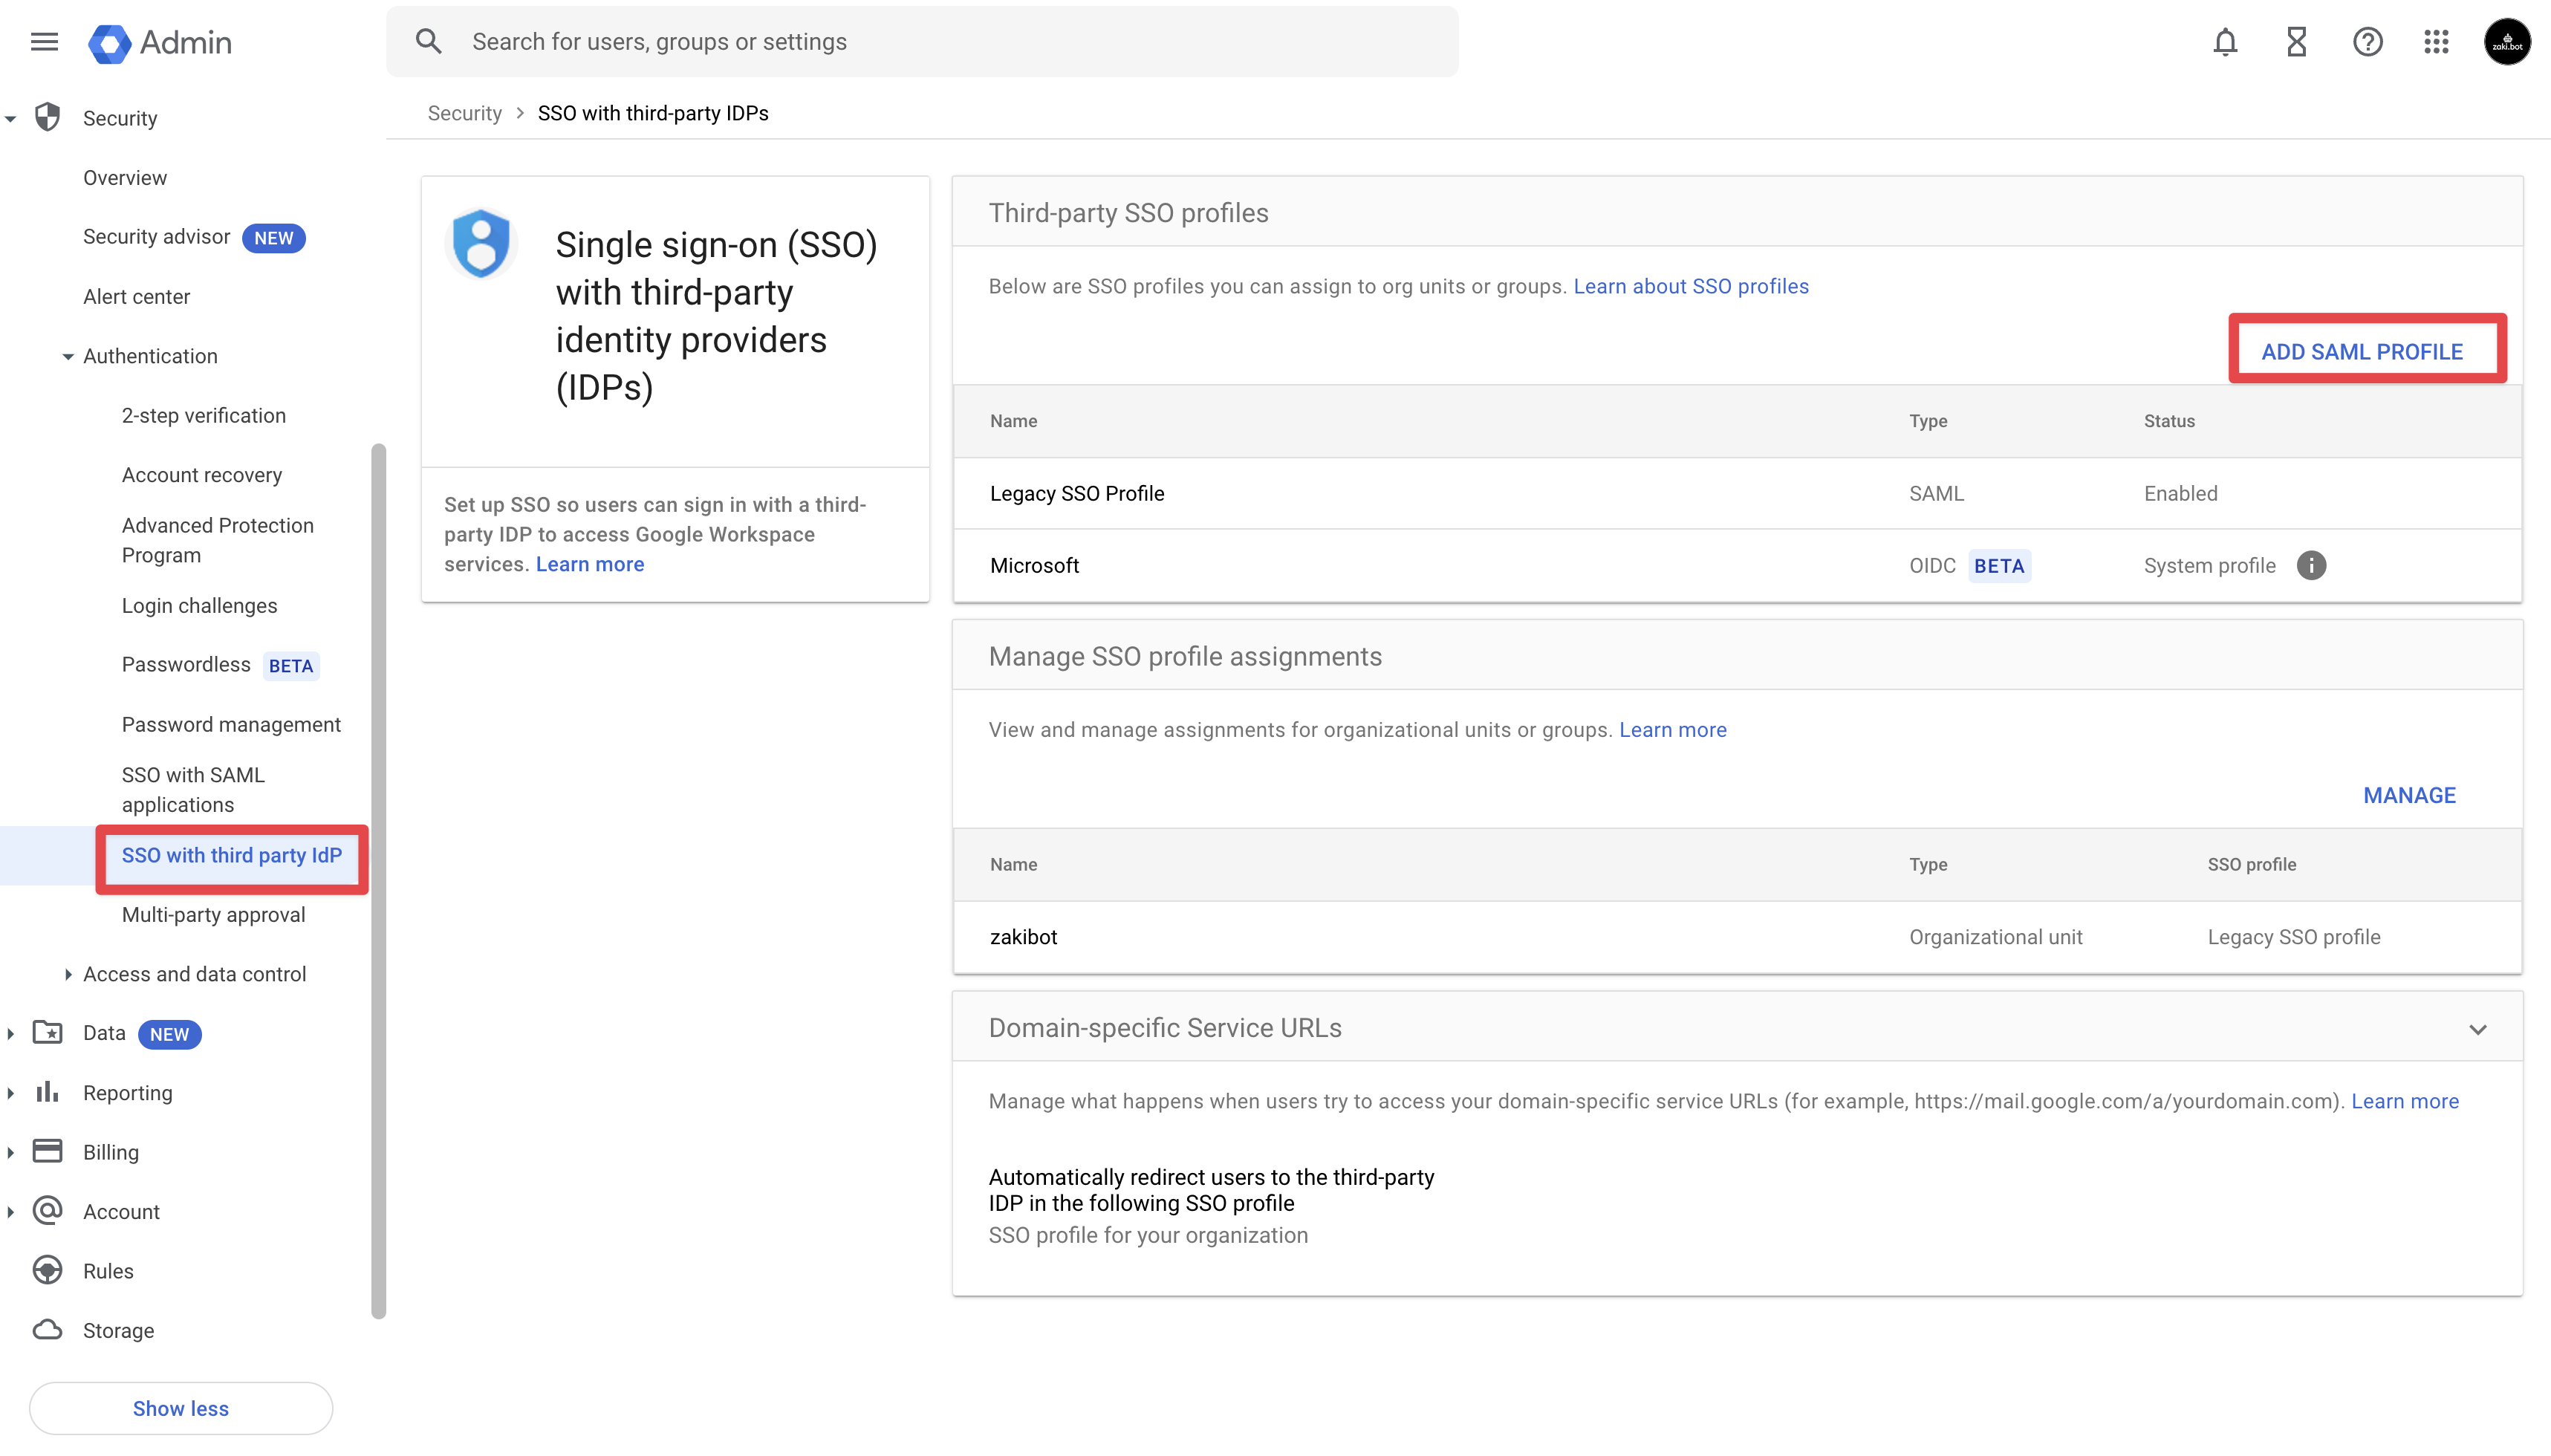
In the Google Workspace admin dashboard, add a 3rd party SSO profile for the organization
-
In your Google Admin console (at admin.google.com)...
Go to Menu and then Security > Authentication > SSO with third party IdP.
Requires having the Security settings administrator privilege. -
In Third-party SSO profiles, click Add SAML profile.
-
At the bottom of the IdP details page, click Go to legacy SSO profile settings.
-
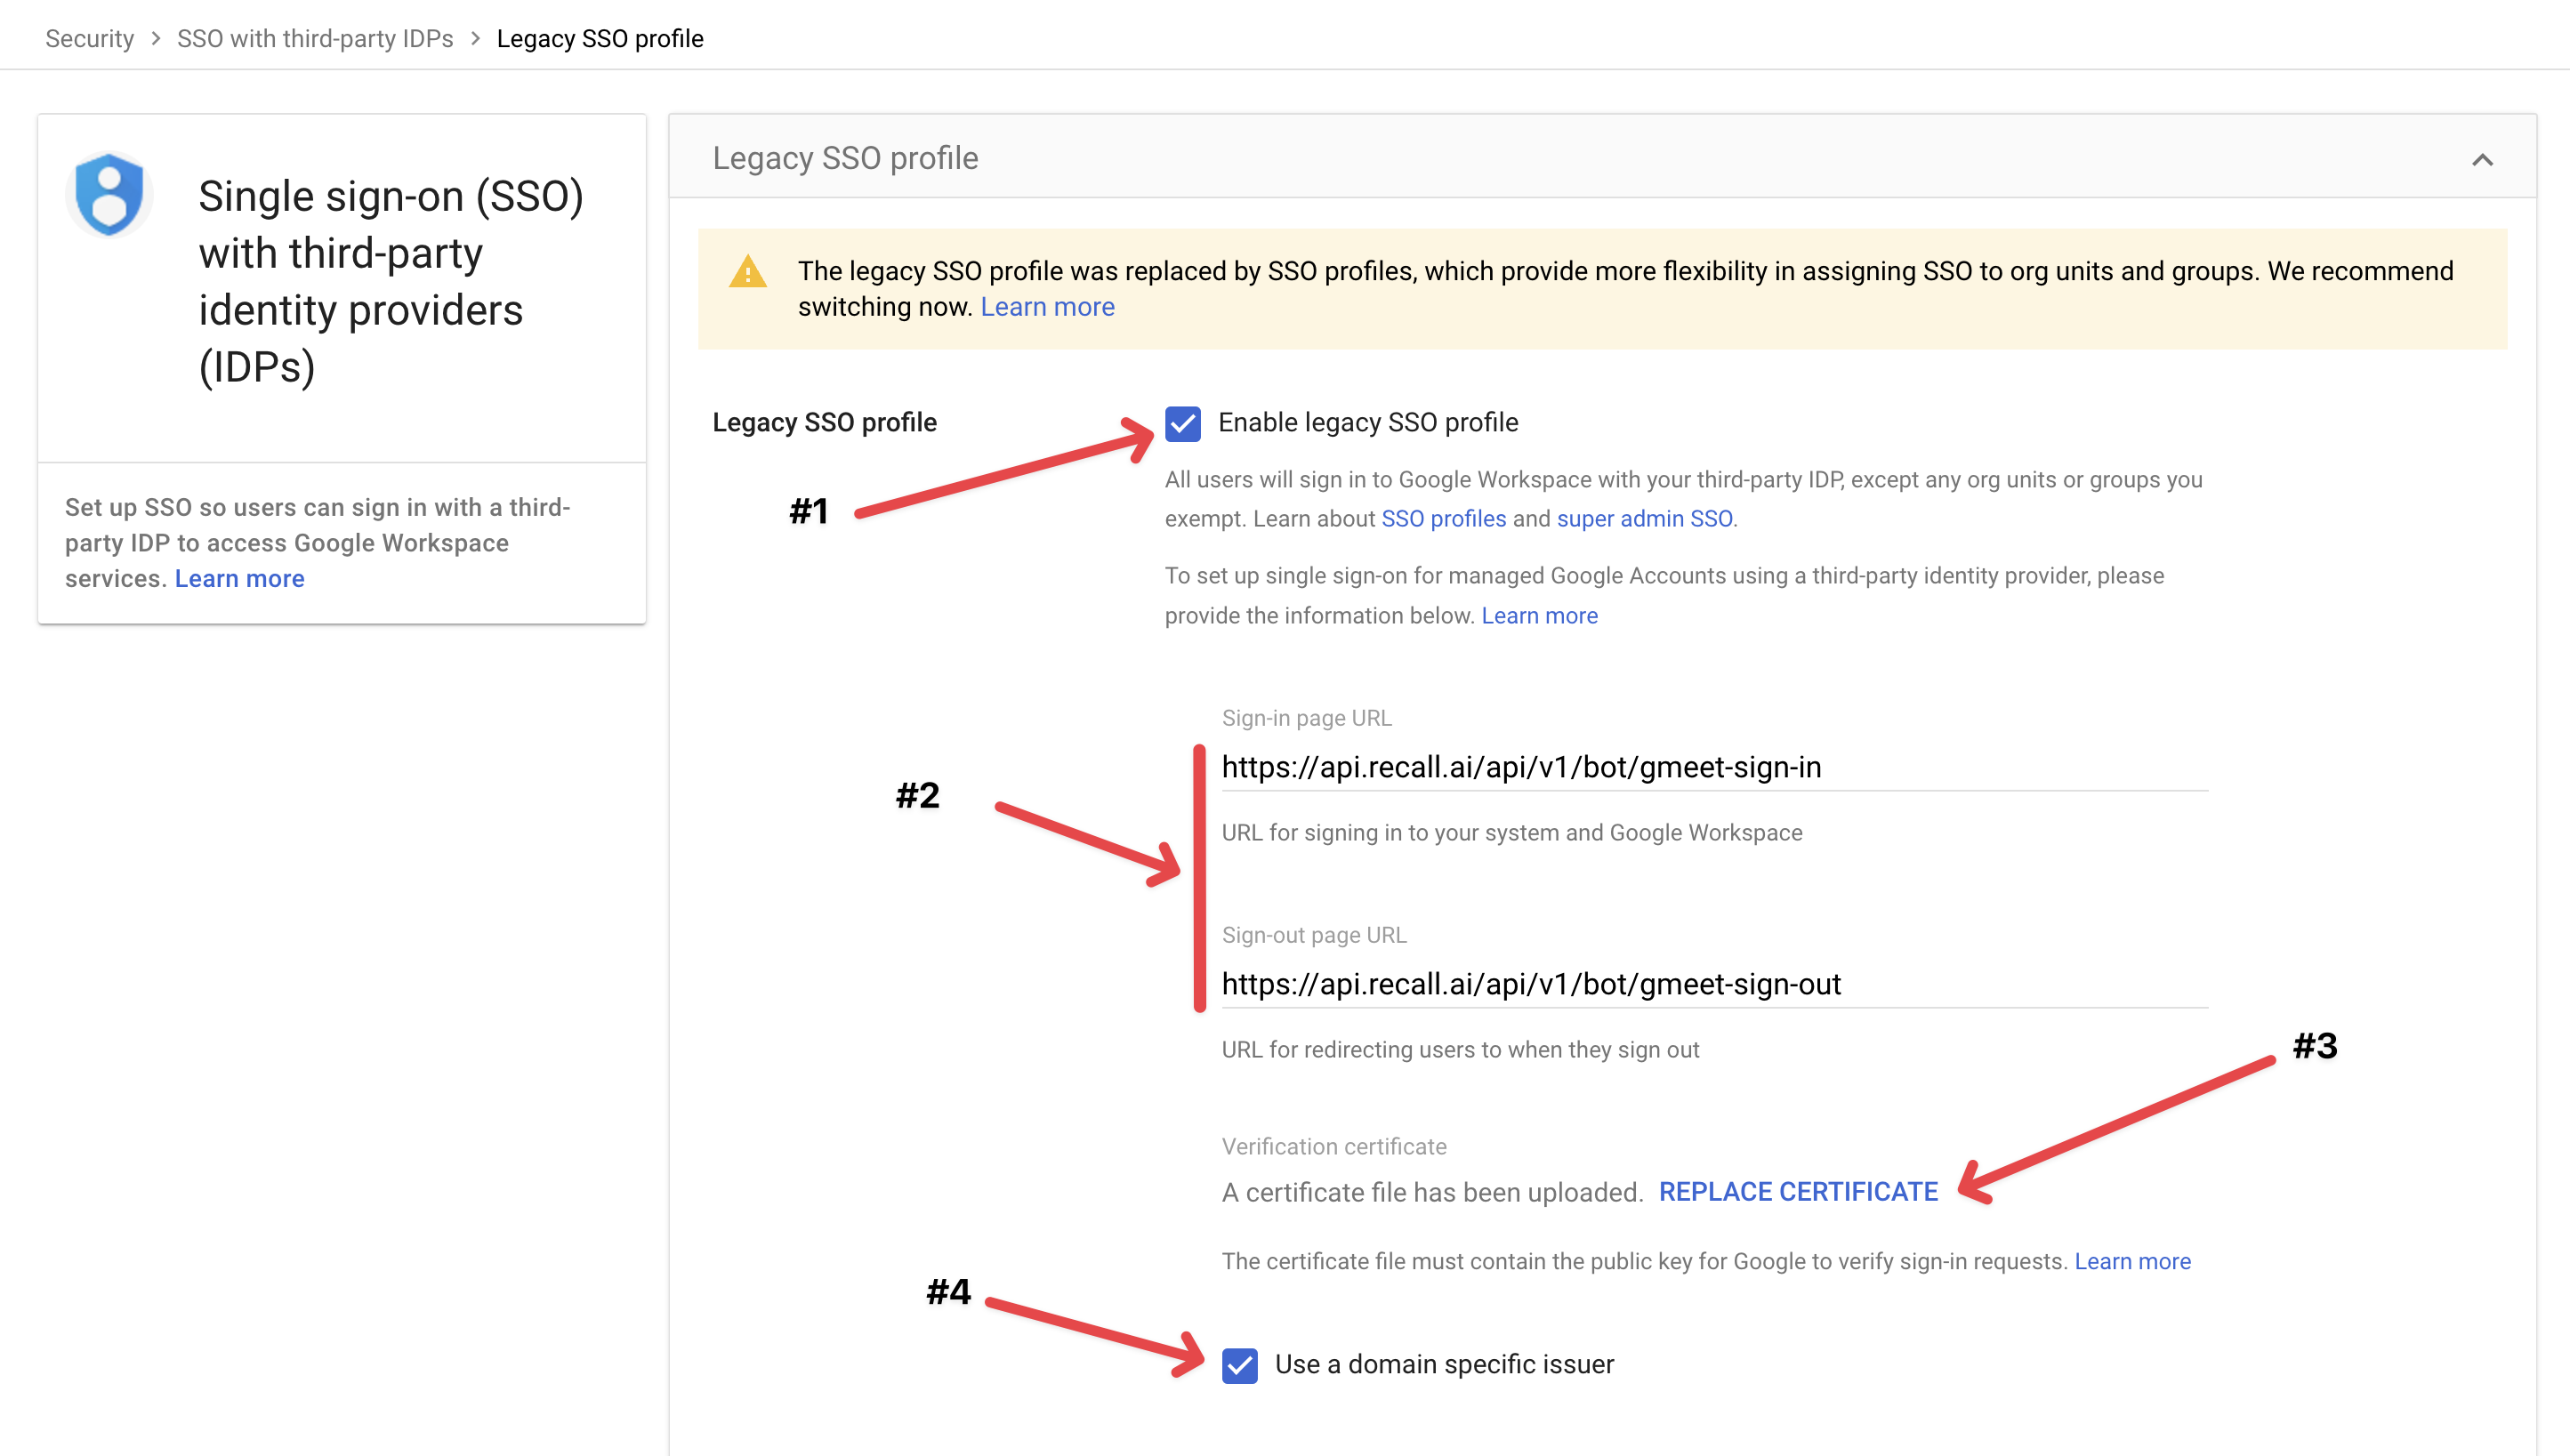
On the Legacy SSO profile page, check the Enable SSO with third-party identity provider box.
-
Setup redirect URLs
- Sign-in page URL: https://us-east-1.recall.ai/api/v1/bot/gmeet-sign-in
- Sign-out page URL: https://us-east-1.recall.ai/api/v1/bot/gmeet-sign-out
-
Verification certificate: Upload the
cert.pemfile created in step 1 -
Check "Use a domain-specific issuer"Scroll to the bottom and click "Save"
-
-
Return to the SSO with third-party IDPs page.
Under Manage SSO profile assignments, click Manage: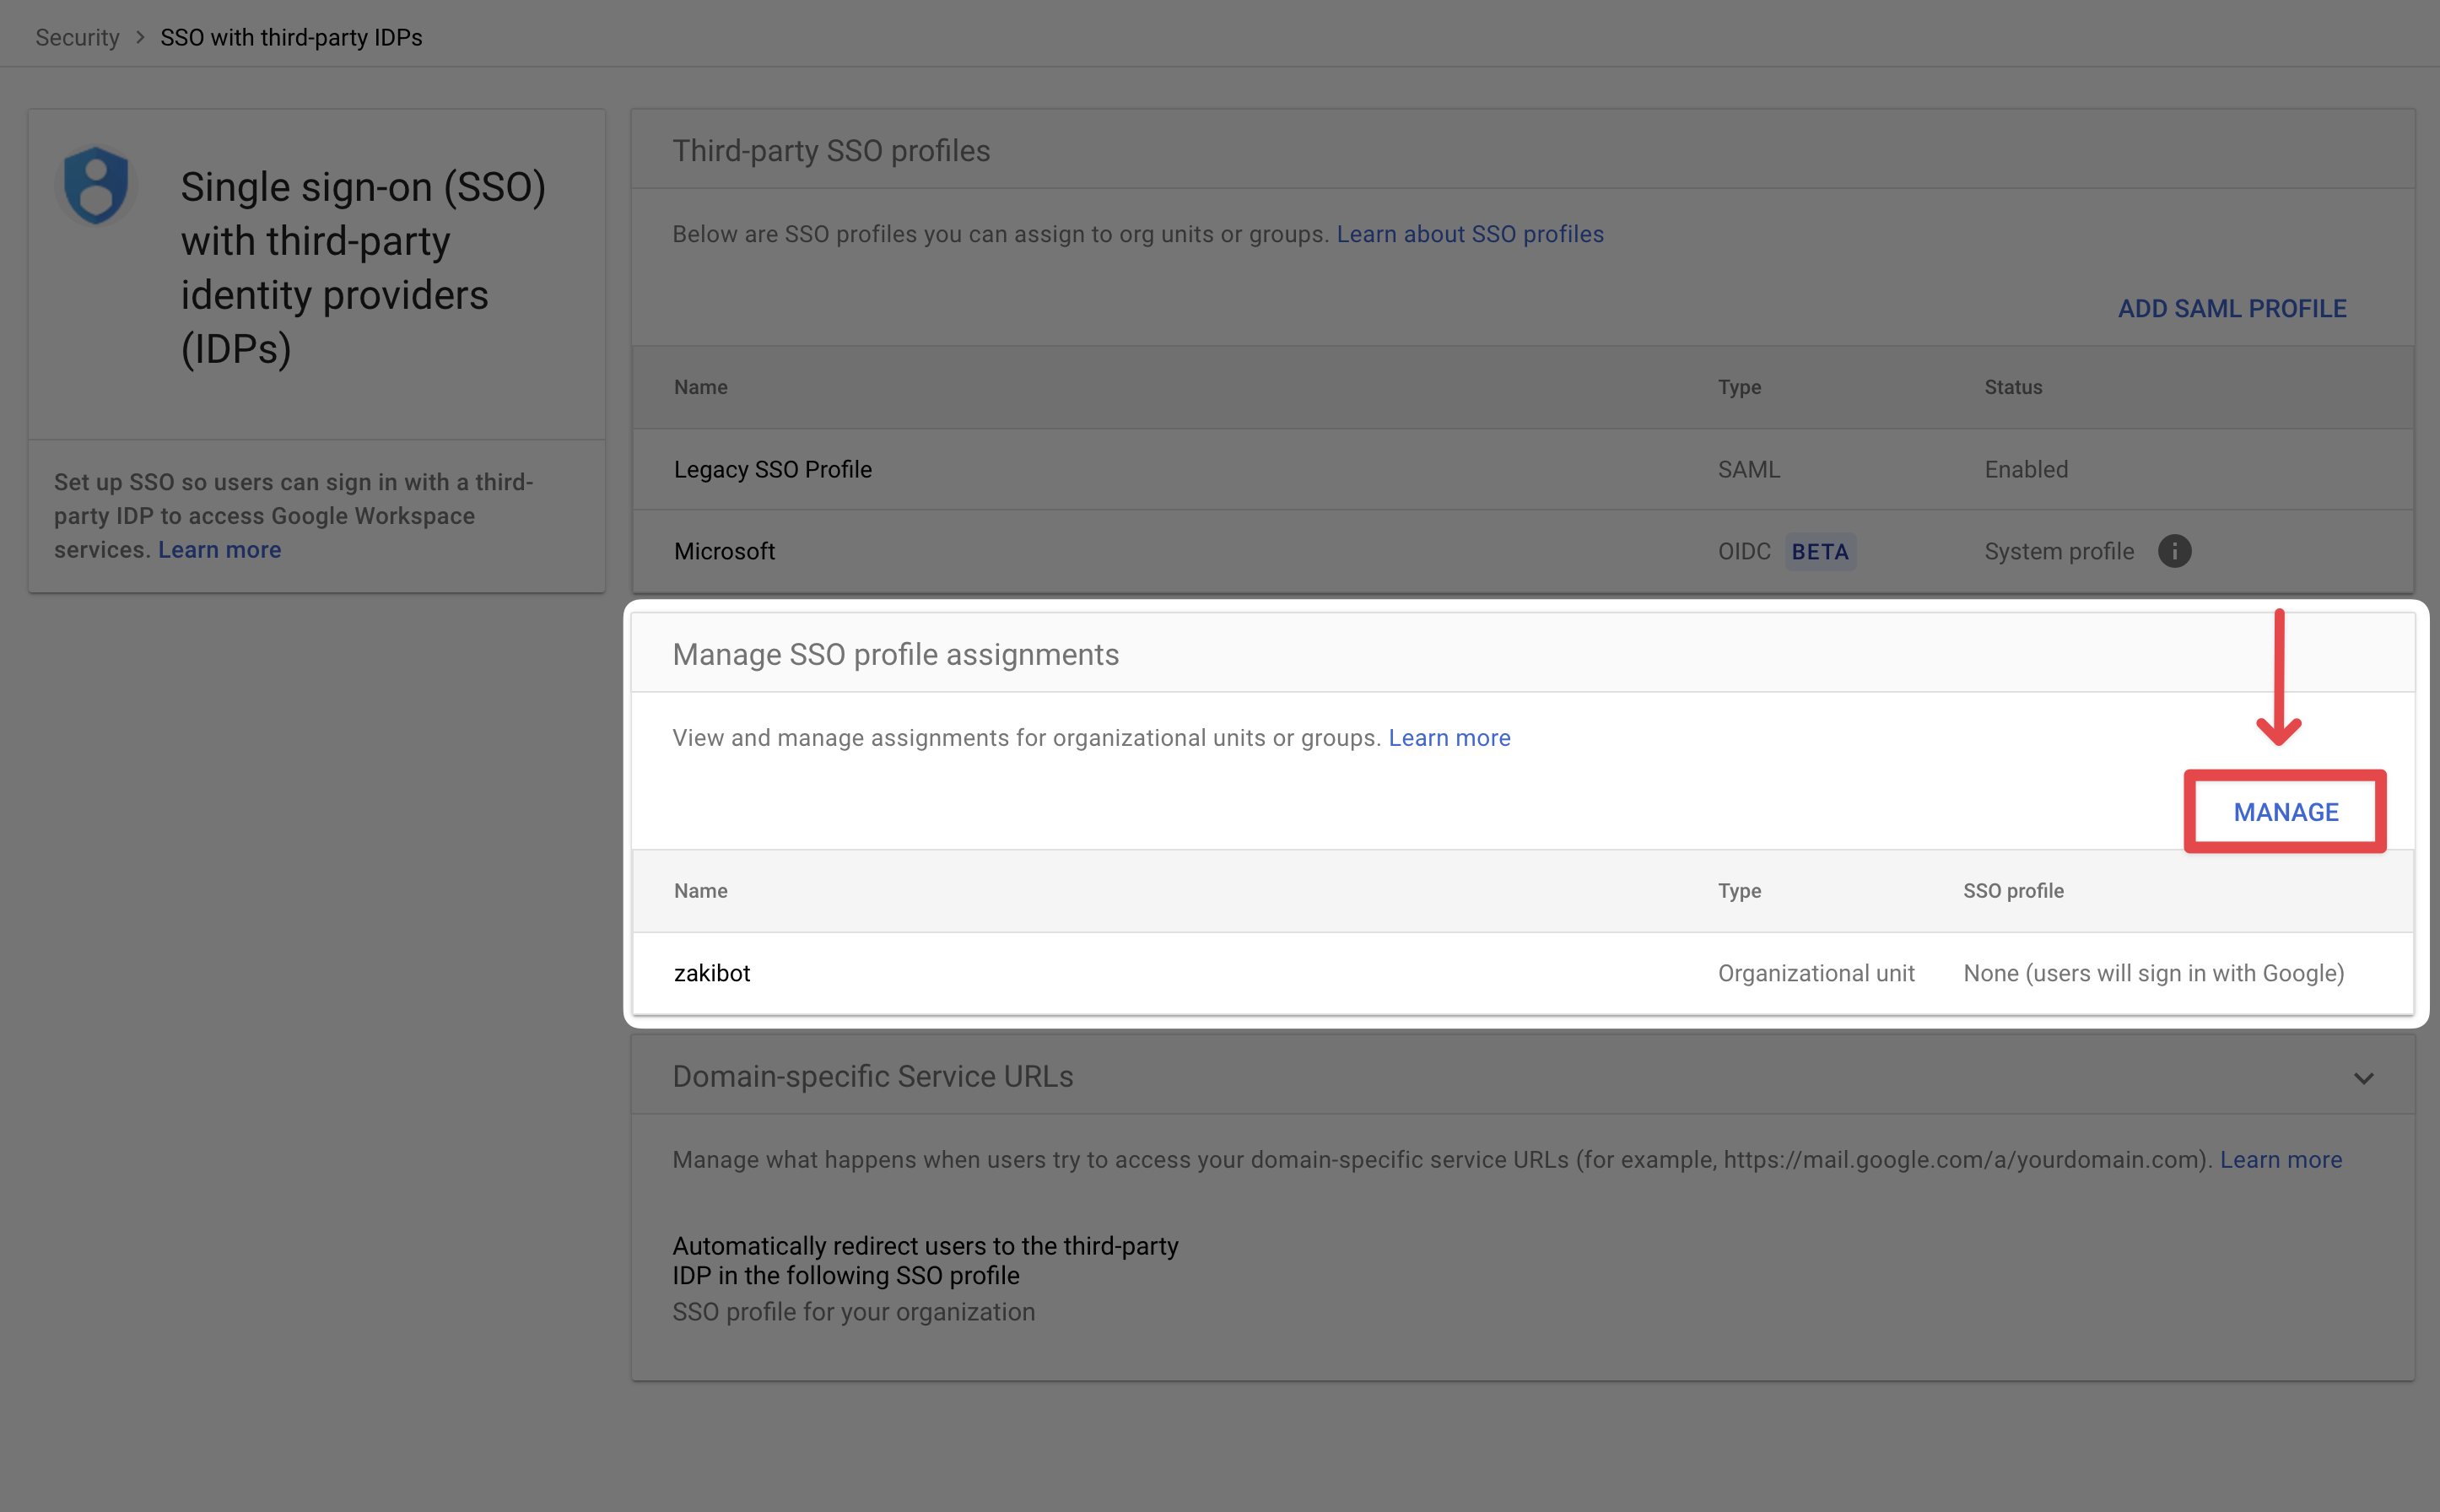
-
Select your Legacy SSO Profile from the dropdown and save:

3. Create a Google Login
Now you can start adding logins(Google accounts) to the login group(created in Step 1).
The easiest way to do this is in the explorer UI:
You can also use the Create Login Endpoint:
group_id- Set this to theidof the login group created in Step 1.sso_v2_workspace_domain- Set this to the domain of the Google workspace created in Step 2sso_v2_private_key- Set this to the private key you generated in Step 2sso_v2_cert- Set this to the cert you generated & uploaded in Step 2email- Set this to the email account you created the Google workspace with (e.gbot@sso.yourcompany.com)is_active- Set this totrueto enable this login to be used by the login group.
Note: We recommend calling this endpoint using Postman, Insomnia, or a related tool, as cURL and the request sender in our docs are known to cause issues with PEM strings. Use form-data so you don't have to re-format the strings.
Verify that the login has been successfully created using the Retrieve Google Login Group endpoint. The logins field in response should include the login created above.
4. Verify Bot Join Call
We have successfully setup a login group with an active login(Google account). Use the Create Bot endpoint to send a bot to a test Google Meet call and specify the login group id as google_meet.google_login_group_id parameter in the request. Also specify google_meet.login_required to force the bot to log in, even if it's not required to join the meeting, to ensure the bot uses the credentials to join your test meeting. You don't need to specify this parameter in normal usage.
- You should receive the bot's request to join the call
- The bot should have the name and profile picture which was setup when creating the new Google Workspace.
- Additionally, you can invite the bot's email address (e.g
bot@sso.yourcompany.com) to a Google Meet call. This will ensure the bot automatically joins the call instead of being in the waiting room.
5. Adding more Logins
Handling high login concurrency
If a login group runs out of enabled (
is_active) Google logins (accounts) due to high concurrent usage the affected bots will produce afatalevent withgoogle_meet_login_not_availableas the sub code.This indicates you need to add more Google Logins to the affected login group.
Each login supports roughly 30 concurrent logins, but we recommend you err on the side of caution when deciding on a number of logins to create.
We recommend creating at least 3-4 logins to start, especially if you expect to have multiple bots joining the same call at any point.
To add more logins:
Create a new user in the Google workspace
Add a new user to the Google Workspace. Google has written detailed steps to create a new user in your Google Workspace account.
Create Login in Recall
The easiest way to do this is in the explorer UI:
You can also use the Create Login Endpoint to add the login in Recall.
Verify Multiple Logins
To verify that all logins added to a login group work correctly, you can schedule multiple bots (same as the number of logins associated with a login group) to join a test Google Meet call at the same time(use the join_at parameter in the Create Bot request).
We recommend to configure all logins(Google accounts) belonging to a login group to have similar properties such as profile picture, account name etc.
Troubleshooting
Check these things if signed-in Google Meet bots are failing to join calls.
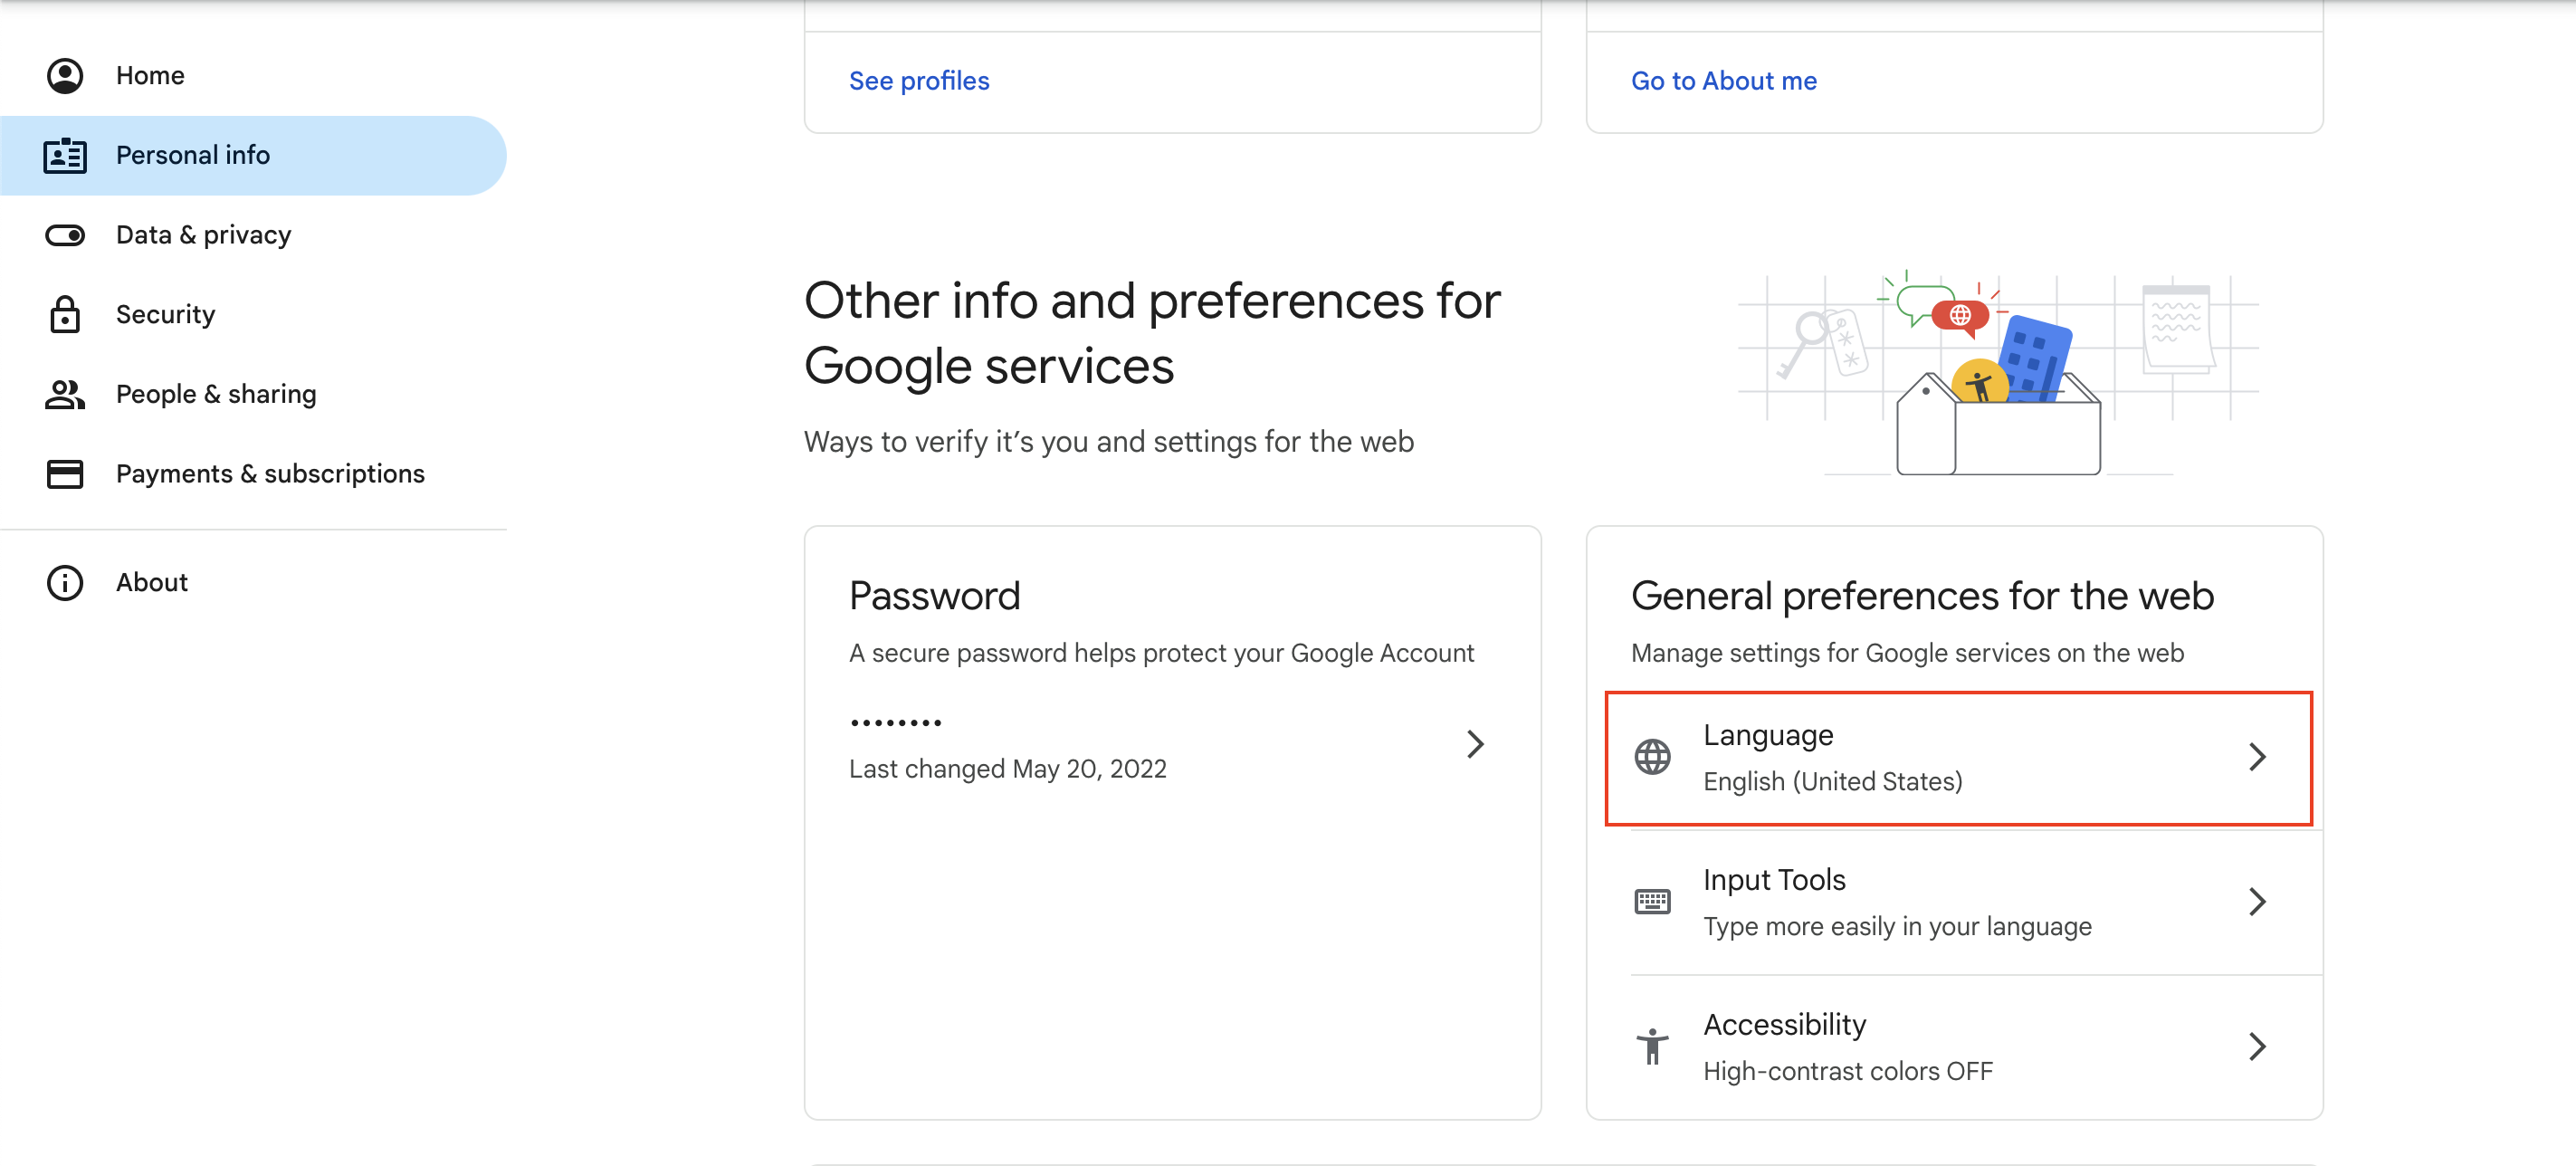
Check the language of the bot's Google account preferences
Authenticated bots rely on language-sensitive context to join calls.
To ensure authenticated Google accounts can join calls, make sure the language is set to en-us by navigating to https://myaccount.google.com/personal-info and checking this setting:
Personal info > General preferences for the web > Language ➡️ English (United States)
Other Questions? Check out the Authenticated Bots FAQ.
Updated 5 months ago