Microsoft Outlook
Recall allows your users to sync their outlook calendar and set auto recording preferences for their meetings.
Creating Microsoft OAuth App
To enable this feature, follow the steps listed below
-
Register Microsoft OAuth App. More info on this here https://docs.microsoft.com/en-us/azure/active-directory/develop/quickstart-register-app. Choose "Accounts in any organizational directory (Any Azure AD directory - Multitenant) and personal Microsoft accounts (e.g. Skype, Xbox)" as Supported Account Type option.
-
Configure platform settings for the app, choose "Web" as the platform type. Add
https://api.recall.ai/api/v1/calendar/ms_oauth_callback/as a redirecturi. (_Note: For development purpose, see below for moving app to production/submitting for verification)

- Create a new client secret for the application. Ensure to copy the secret value as this will be needed in a later step. We recommend choosing the longest feasible time for expiry (e.g 24 months). Once a credential gets expired, existing calendar connections will need to be authorised.

- Add the "Calendars.Read" API permission for the app.

- Grab the Application(client) ID from the overview tab.

- Save the client credentials in your Recall workspace. https://api.recall.ai/dashboard/platforms/microsoft
oAuth Client ID = Application(client) ID
oAuth Client Secret = Client secret value from step 3

Building Microsoft OAuth 2.0 URL
Each user in your application must connect their Outlook calendar via OAuth before using calendar integration. The process for connection is triggered by redirecting user to the OAuth URL.
The URL structure should be as follows:
https://login.microsoftonline.com/common/oauth2/v2.0/authorize?
    scope={SCOPES}
    &response_mode=query
    &response_type=code
    &state={STATE}
    &redirect_uri={REDIRECT_URI}
    &client_id={CLIENT_ID}
- SCOPES
This parameter should be space seperated string containing required scopes which are
offline_access,openid,email&https://graph.microsoft.com/Calendars.Read.
Sample value:
offline_access openid email https://graph.microsoft.com/Calendars.Read
-
REDIRECT_URI
This parameter should be one of theredirect_uris configured in your OAuth 2.0 app. -
CLIENT_ID
This parameter should be your OAuth 2.0 app's Application(client) ID property. -
STATE
This parameter needs to be a JSON stringified object, which should contain
a.recall_calendar_auth_token: The calendar auth token for the user. (required)
b.ms_oauth_redirect_url: The redirect_uri (should be same as REDIRECT_URI parameter in the url) (required)
c.success_url: The URL to redirect the user to once authentication has completed (optional)
d.error_url: The URL to redirect the user if the authentication errored (optional)
Sample value:
state=JSON.stringify({
  recall_calendar_auth_token: AUTH_TOKEN_HERE,
  ms_oauth_redirect_url: REDIRECT_URI_HERE,
  success_url: https://yourdomain.com/microsoft-calendar-connection/success,
  error_url: https://yourdomain.com/microsoft-calendar-connection/error,
})
Submitting Microsoft OAuth Client To Production
Before submitting your Microsoft OAuth Client Application to production, please ensure to update the redirect_uri to be on your own domain (rather than being on recall.ai domain) as Microsoft requires to verify domain ownership of each of the redirect URIs added in the app.
For e.g Add https://your_website_domain/api/ms_oauth_callback as redirect_uri. In the request handler for above URL, return a HTTP redirect response to https://api.recall.ai/api/v1/calendar/ms_oauth_callback/.
All request parameters should be forwarded as is from your domain to recall.ai's oAuth endpoint.
More documentation on the process of submitting your app for approval is available here: https://learn.microsoft.com/en-us/azure/active-directory/develop/publisher-verification-overview
Troubleshooting
OAuth Flow Stuck on Admin Consent Step
Some Microsoft workspaces are configured to prevent their users from granting OAuth permissions without admin authorization. If this is the case, your user will see an image like the below:
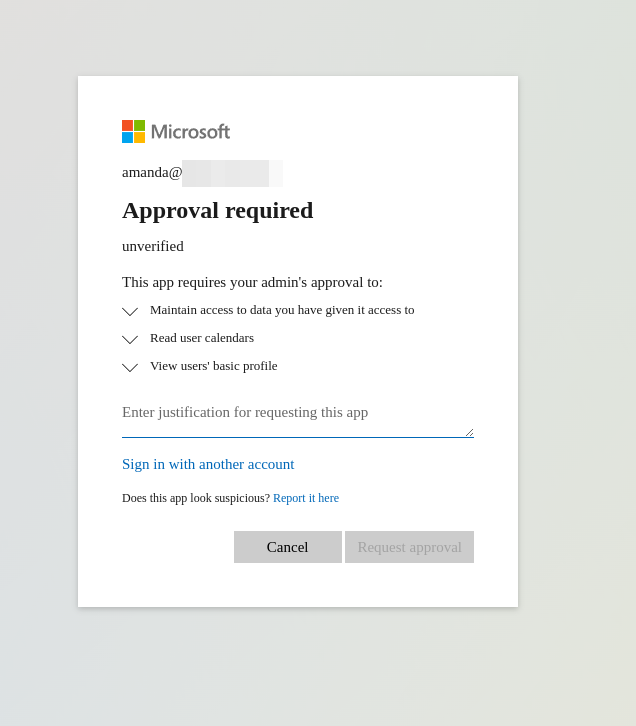
An issue may occur where even after the admin grants permission, users continue to see this pop-up and are unable to give consent to connect their calendar.
The reason for this is the prompt=consentquery parameter, which causes the "approval" prompt to always show up, regardless of whether the app was approved or not.
The solution is to remove the prompt=consent query parameter when you construct your OAuth request.
Updated 3 months ago